User Guide · Nonnanest
Everything you need
to know about your
Nonnanest.
A complete guide to setup, calibration, and getting the most from your monitor. No WiFi, no app, no subscriptions — just peace of mind.
Safety warnings
Please read these warnings carefully before setting up your Nonnanest monitor. Your family's safety comes first.
Keep the power cable and all cords away from your baby at all times. A cable near the crib can pose a serious entanglement risk. Always route cables along walls and out of reach.
Keep the camera unit, power supply, and all cables at least 3 feet (1 meter) away from the crib mattress surface. Never place any part of the monitor inside the crib or bed.
Use only the included power adaptor (DC 5V). Do not use third-party chargers or adaptors, as these may damage the device or create a safety hazard. Do not touch the plug with sharp or metal objects. Keep the monitor away from water, heaters, and humidifiers.
- Assembly must be completed by an adult.
- Do not cover the monitor or camera with towels, blankets, or other soft materials.
- Do not expose either unit to extreme heat, humidity, or liquids.
- Keep both units out of reach of children at all times.
- Store this guide somewhere accessible for future reference.
What's in the box
Your Nonnanest ships complete — everything you need to get started is included.
Nonnanest connects via FHSS encrypted radio — a private, dedicated signal between your camera and display. There's nothing to download and no account to create.
Camera setup & mounting
Both mounting options are included. Choose the one that suits your nursery — you can always switch later as your baby grows.
Choosing your mount
Flexible Crib Mount — Perfect for newborns. Clips onto the crib rail and adjusts to position the camera directly above the mattress at the ideal downward angle.
Wall Mount Bracket — Flush-mounted and out of reach, ideal once your baby can sit or pull to stand. Provides a permanent, secure install.
For the most accurate skin temperature readings, the camera should be positioned directly above the crib, facing downward. Before mounting, measure the distance from where the camera lens will sit to the mattress surface — you'll use this in Step 5 (distance calibration).
Powering the camera
- Connect the USB-C power cable to the camera unit.
- Route the cable safely along the wall or crib frame, secured out of baby's reach.
- Plug the adaptor into a wall outlet.
- The camera status light will briefly illuminate, then go dark — this is by design. No LEDs remain visible during normal use.
Pairing your display
The camera and display are factory pre-paired. Simply power on both devices and they will automatically connect over FHSS.
Press and hold the power button on the top of the handheld display for 3 seconds. The display will turn on and locate your camera within a few seconds.
If you ever need to re-pair the devices, hold the pairing button on both the camera and the display simultaneously for 5 seconds. The display will flash blue during pairing and stop when connected. If pairing doesn't succeed within 30 seconds, it will exit automatically — try again from a closer distance.
Keep the handheld display and camera at least 1.5 meters (5 feet) apart during use to prevent audio howling or feedback. Avoid pointing the display's microphone directly at the camera.
Distance calibration
The infrared sensor that reads your baby's skin temperature is highly accurate — but it needs to know how far it is from the crib mattress to calibrate correctly. This is a one-time setup step.
How to measure
Use a tape measure from the camera lens straight down to the mattress surface. Take note of this distance in feet or centimeters.
Selecting your setting
Go to the Settings menu on the handheld display and choose the Distance setting that contains your measurement.
| Setting | Metric | Imperial |
|---|---|---|
| Close | 60 – 80 cm | 2.0 – 2.6 ft |
| Near | 80 – 100 cm | 2.6 – 3.3 ft |
| Standard Default | 100 – 120 cm | 3.3 – 3.9 ft |
| Far | 120 – 150 cm | 3.9 – 4.9 ft |
Pediatric guidelines recommend a minimum of 3 feet (1 meter) between the camera and the crib mattress. The "Standard" default setting is already calibrated for this safe range — so if you haven't measured yet, Standard is a safe starting point. The more accurately your setting matches your actual distance, the more reliable your skin temperature readings will be.
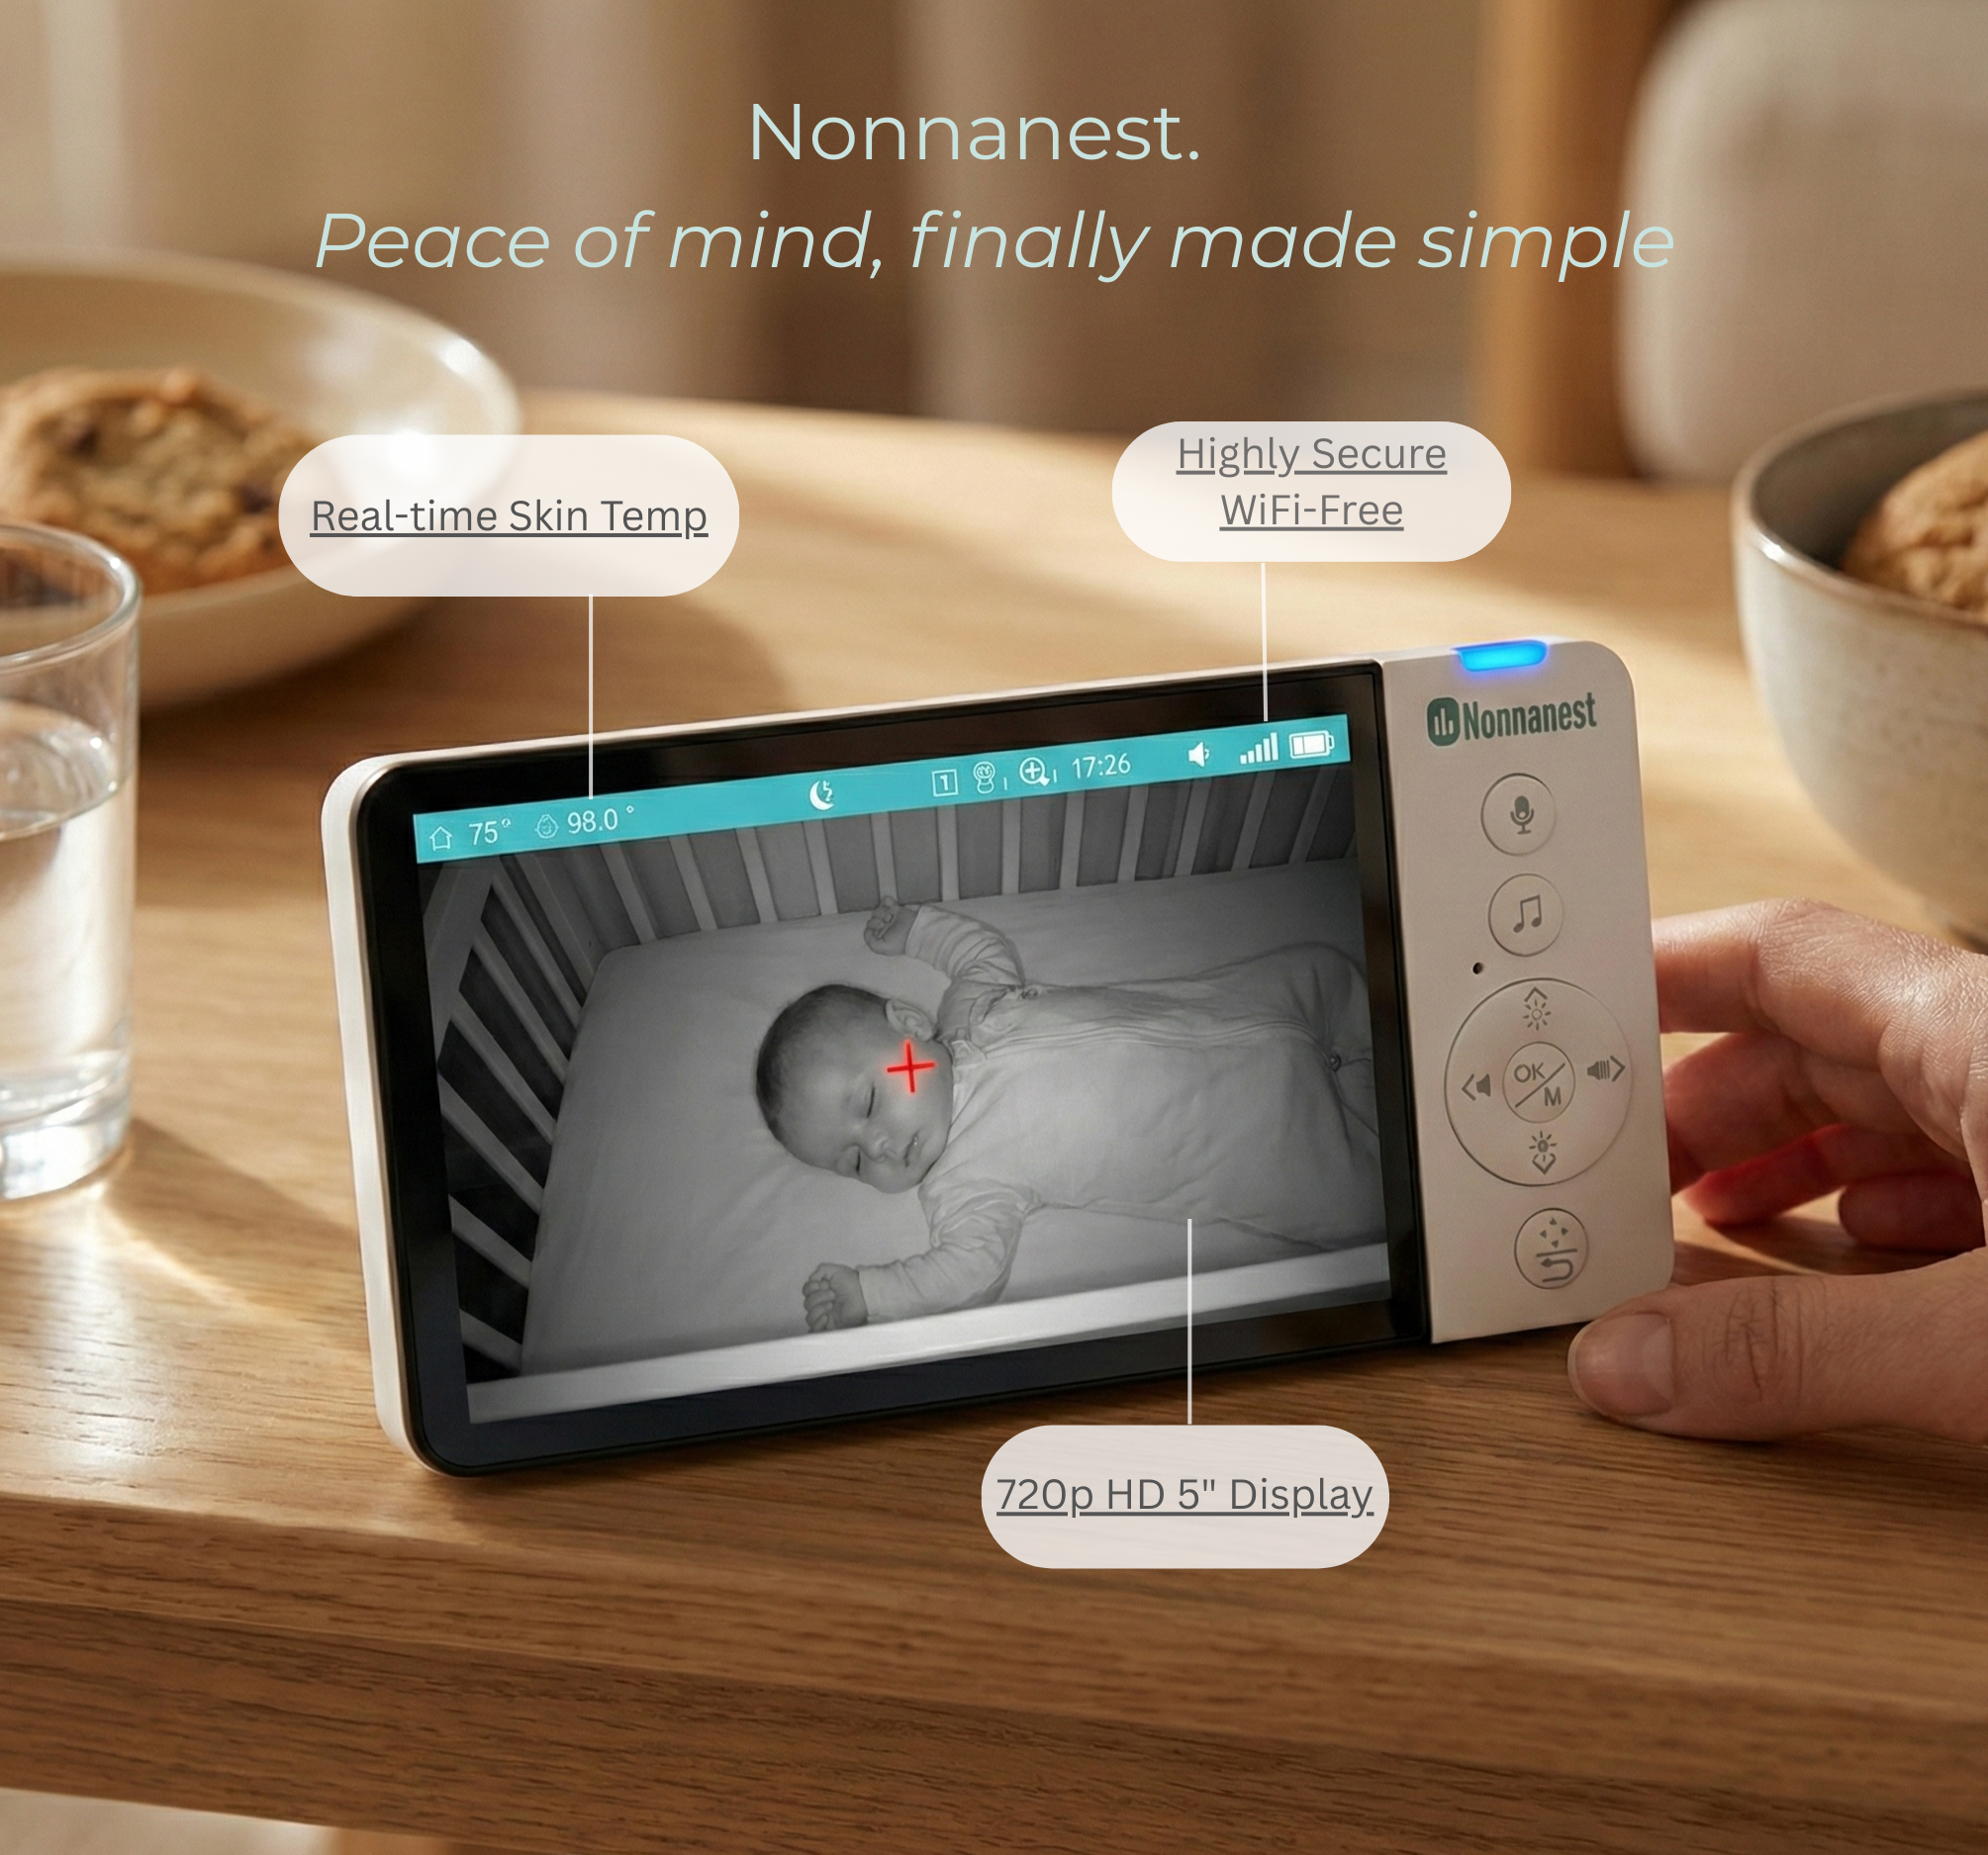
Handheld display overview
The 5-inch HD handheld display is your window into the nursery. Here's what you'll see on screen when paired.
Upper status bar
The teal status bar across the top of the display shows your live readings at a glance. Here's what each element means:
 72°
72°
 98.6°
98.6°

Temperature defaults to °F. To switch to °C, go to Settings → Temperature → Unit. This is a one-time setting that stays saved.
Settings menu (lower bar)
Press the Menu (OK/M) button to open the settings menu. Icons scroll across the bottom of the screen — navigate with the left/right arrows and press OK to enter any setting.
Display buttons (right side panel)
- Microphone button — Hold to activate two-way audio (intercom)
- Music note button — Activate lullabies directly
- Navigation ring (OK/M center) — Open menu / confirm selections
- Direction arrows (◀ ▶) — Adjust volume; navigate menus left/right
- Pan/tilt buttons — Control camera rotation remotely
- Night vision / brightness buttons — Adjust screen brightness or toggle night vision
Camera pan & tilt
Your camera supports 355° pan and 60° tilt remote control. From the main view, press the PTZ button on the display, then use the directional keys to rotate the camera up, down, left, or right until you have the view you want.
Skin temperature monitoring
Nonnanest uses a contactless infrared sensor to read your baby's skin temperature continuously, without any wearables or physical contact with your little one.
How it works
The infrared sensor in the camera measures the radiant heat from your baby's skin surface — specifically from the forehead area as your baby lies in the crib. The reading is displayed in real time on the parent display alongside the room temperature.
Nonnanest measures skin surface temperature, which naturally varies with room conditions, clothing, and your baby's activity. Skin temperature readings are wellness indicators — they help you spot patterns and shifts over time, not provide clinical measurements. Always consult your pediatrician if you have health concerns about your child.
Wellness alerts
The display will gently alert you when skin temperature patterns shift noticeably — no manual threshold configuration is needed. When an alert appears, a visual indicator will show on screen. If sound alerts are enabled, a soft beep will sound and you can press any button to dismiss it.
These alerts are wellness cues to check on your baby — not clinical diagnostics. If your baby's skin temperature reading seems elevated, check on them directly and contact your healthcare provider if you have concerns.
Getting accurate readings
- Ensure distance calibration (Section 04) matches your actual camera height.
- Position the camera directly above the crib, facing straight down.
- Allow 10–15 minutes after room temperature changes for readings to stabilize.
- Room air circulation, fans, and vents near the crib can affect readings — minimize drafts directly over the crib.
- The infrared sensor has a natural margin of ±1°C / ±1.8°F.
Settings & features
Access all settings via the Menu button (OK/M) on the handheld display. Use the directional arrows to navigate between options and OK to confirm.
Volume
Press the left or right directional arrows directly from the main view to adjust volume. Six levels are available (0–6). Audio from the camera is always transmitted — volume only affects playback on the display.
Two-way audio (Intercom)
Press and hold the microphone button on the display to speak directly to your baby through the camera speaker. Release the button when you're done. This is a push-to-talk mode — your voice transmits only while the button is held.
Lullabies
Press the music button or navigate to Menu → Lullaby. Select an individual track or choose the "loop all" option to cycle through all lullabies continuously. Press the music button again to stop. Long-press the music button from the main screen to activate loop-all playback as a shortcut.
VOX / Sound-activated screen wake
VOX mode automatically wakes the display screen when the camera detects sound above a set threshold — useful when you want the screen to stay dark until your baby stirs.
- Navigate to Menu → VOX and toggle on or off.
- When VOX is on, the screen dims after 30 seconds of silence and wakes automatically when sound is detected. Audio is always transmitted even when the screen is off.
- Short-press the menu key from the main screen to toggle VOX on/off as a shortcut.
- When VOX is off, the screen stays illuminated continuously.
Display brightness
Press the brightness buttons (or navigate via Menu → Brightness) to cycle through six brightness levels. Lowering brightness extends battery life and is useful for nighttime use without disturbing the bedroom.
Night vision
Night vision activates automatically when the camera's ambient light sensor detects a dark environment. The infrared LED illuminates the room invisibly, giving you a clear black-and-white image without disturbing your baby's sleep. You can also toggle it manually from the display.
Temperature units (°F / °C)
Navigate to Menu → Temperature → Unit to switch between Fahrenheit and Celsius. This setting is saved and persists between sessions.
Feeding reminder
Navigate to Menu → Alarm to set a recurring feeding reminder. Available intervals: 30 min, 1h, 2h, 3h, and 4h. When the reminder fires, the display will beep and a feeding icon will flash on screen. Press any button to dismiss.
Zoom
Navigate to Menu → Zoom to select digital zoom levels. Use this to get a closer view of your baby without physically moving the camera.
Video recording (SD card)
Nonnanest supports local video recording to a microSD card (up to 32GB, FAT32 format). Insert the SD card into the slot on the camera unit. From the main screen, press and hold the center button for 1.5 seconds to start recording — a flashing indicator will appear. Press and hold again to stop. Recorded video can be viewed by removing the SD card and playing it on a computer. Playback on the display is not supported.
System clock
Navigate to Menu → Time to set the current time (hours, minutes, seconds). Use the directional arrows to adjust each value and confirm with OK.
Display orientation
If you mount the camera upside down for a particular installation angle, you can flip the display image. Navigate to Menu → Camera → Orientation and select the correct rotation.
Troubleshooting & FAQ
We're real people and we respond quickly. Email us anytime at hello@nonnanest.com — we typically respond same day.
Care & maintenance
A little care goes a long way in keeping your Nonnanest performing well for years.
Cleaning
Clean both the camera and the handheld display with a slightly damp soft cloth. Do not use harsh chemicals, solvents, or abrasive cleaners — these can damage the device surface and may void the warranty. Allow both units to dry completely before use.
Storage & environment
- Keep both units away from direct water sources, steam, and high humidity environments.
- Do not expose either unit to extreme heat — keep away from radiators, space heaters, and direct sunlight.
- Store in a cool, dry location when not in use.
- Do not drop or subject either unit to physical shock.
Infrared lens care
The infrared lens on the camera is the key to accurate skin temperature readings. Keep it free of dust, fingerprints, and smudges. Clean gently with a dry microfiber cloth — avoid touching the lens directly. Never use liquid cleaners near the lens opening.
Specifications
Want to get set up quickly? The Quick Start Guide walks you through the essentials in about 5 minutes.
View Quick Start →